Wednesday, December 24, 2014

The Big Move - Part 1 - Setting up your custom domain to work with Office 365!

To say that I did a big move would be a complete lie.  I have a couple of domains that I have email addresses attached to as well as two POP3 accounts (from my college days) that I would like to aggregate into one place.  Gmail was able to do this for me for many years, but I have since wanted to explore the Office 365 offering by Microsoft a lot deeper, so I started the process of moving over some of my "lesser used" domain /email combinations.  When I say "move", I don't mean that I migrated the mailbox - I just simply configured everything so that any future email would flow into my Office 365 account.  I figured this would be easier and safer in case I wanted to switch back quickly -- especially considering I probably get one or two email messages per week in my lesser used accounts.  I did eventually do a mailbox move, but I will cover this in another blog post.

Again, this is an additional domain and email address that is being added to my already established Office 365 account.  The intent is to have all of my various email accounts aggregate into one mail box.  I will also show how to get POP3 email into this one account as well as some tips I used to make mail management a lot easier in another blog post.

So, here is what I did:

First, I logged into my freshly new Office 365 tenant and went to Admin / Office 365:

Then on the left side of the screen you will see a place for you to click on called "Domains":

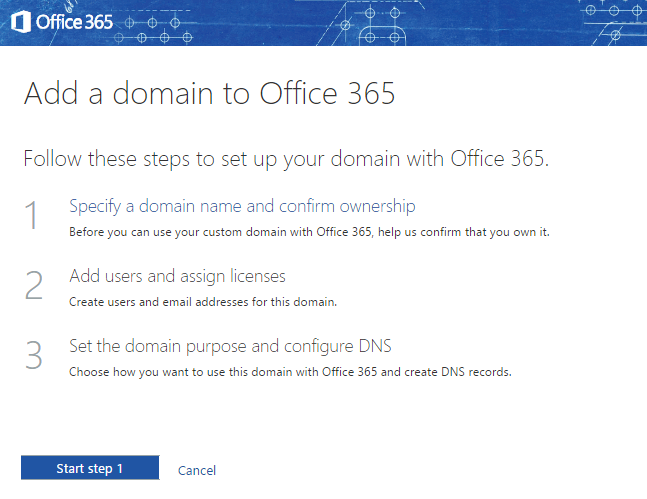
You will then be presented with the following screen.  These are the three steps you need to take in order to get your domain set up.

Once Step 1 is selected, you will be presented with the following dialog.  Enter the domain name you want to start to use with Office 365.  I used a domain of a business I used to have but still get email through:
Office 365 will interface with most registrars to make your DNS modifications to allow email to flow to Office 365. 

Once you continue, you will see a dialog box that is generated by GoDaddy (my registrar and where I maintain my DNS):

Just click ACCEPT and voila:

Now, what you can do is start adding user accounts.  BUT... I chose not to - Keep reading:


Because I just have one mailbox license for Office 365 and I have it configured with another email address with another domain, I will choose not to add any users.  What I will do instead is configure Office 365 to direct all inbound email to this domain to my primary email account.  This will become apparent later in this post.

This step sets up the DNS information properly.  It will want to know how you want to use Office 365 with this domain and then make the appropriate DNS modifications - see the next three screen shots:


There you have it - Now your domain is configured to be used with Office 365!

You will now have to configure Office 365 to be able to accept inbound email from this new domain and then determine what happens to the email.  Additionally, you will need to configure Office 365 to be able to send from this domain as well.  I will be covering all of this in my NEXT blog post, so stay tuned!

** Remember, this is a second domain and email address that is being added to my already established Office 365 account.  The intent is to have all of my various email accounts aggregate into one mail box.  I will also show how to get POP3 email into this one account as well as some tips I used to make mail management a lot easier. 


Wednesday, November 12, 2014

Office 365 Mailbox De-Clutter

Since I was a Gmail user for so long, I got used to some of the features and subsequently took them for granted.  One of those features was the automatic classification of email on perceived "importance".

Gmail took it a step further and started to break out email into multiple groups such as: Social, Forum, Updates and Promotions.  This made it nice to really de-clutter my mailbox within Gmail and I started to miss this once I migrated over to Office 365.  

Well, apparently just a few days ago, the Clutter feature came out. This feature learns your behavior and will classify certain inbound email as clutter.   I enabled it, and it is starting to actually learn my behavior within two days.  

If you want to enable it in your Office 365 mailbox, launch OWA, (http://portal.office.com - Click on "OUTLOOK") click on the GEAR icon, and click OPTIONS:


You will then be presented with the options under Mail / Automatic Processing.  Select the option "Separate items identified as Clutter":


... and that's it.  You will notice a new folder in your inbox called Clutter.  This is where all of the newly classified email will be directed.


If you want to learn more about this feature and how it really works, this is a great blog article put out by Microsoft:  


Monday, November 10, 2014

Leaving Gmail - Hello Office 365!

I've been a Gmail user for years and consequently, I've found myself quite embedded in the Google line products.   I have an Android and also use the connected products (like this blog), but Gmail has always been on my list of products to migrate away from.

Notwithstanding the privacy issues that are continually raised on the Google platform, I wanted to untangle the complex web I had to create in order to make everything work for me on the Gmail platform.  This was further prompted by my renewal at GoDaddy that was topping $200 annually. (More on this later...)

Granted, I don't have a ton of email, and nothing I am doing is enterprise class, but I do have my personal account (a vanity domain), a business type of personal account (also a vanity domain), a couple of POP3 accounts that my alma maters have set up for me, and an exchange account that I have to use to communicate to my students (I teach at a local college).  Quite a mess if you have to keep track of email from a number of different interfaces...
... and how would this all work with mobile access??

Well, Gmail was here to save the day - Kind of...
I did get everything to work pretty well, but I had to do a number of workarounds to make everything click.  Gmail gave me a lot of space (I'm currently using 7GB of my 15GB mailbox) and I absolutely fell in love with the Archive function.

Over time, some of the Gmail shortcomings started to bother me, and with my last GoDaddy bill, my "want" to start to consolidate everything (from GoDaddy, to Gmail, to Exchange) prompted me to start to look at Office 365 is a viable alternative to my Gmail mailbox - a central repository for all of my mail.
What were some of the issues with my current setup?  Godaddy's SMTP Relay limits and Gmail's "On behalf of" problem. A description of this is clipped here from Wikipedia:
"... any email sent through the Gmail interface included the Gmail.com address as the "sender", even if it was sent with a custom email address as "from". For example, an email sent with an external "from" address using Gmail could be displayed to a receiving email client user as From user@gmail.com on behalf of user@OtherDomainEmailAddress.com (the display used by versions of Microsoft Outlook). By exposing the Gmail address, Google claimed that this would "help prevent mail from being marked as spam..."
This was unacceptable to me, so I signed up for SMTP Relay accounts with GoDaddy and routed my mail through them instead of the Gmail servers.  GoDaddy would only allow 50 messages per day with their SMTP relay service, which would also pose a problem for me at times.

Since I work for a Microsoft Gold Partner, I started to see first-hand the functionality Office 365 had, and was moving closer and closer to setting up a "tenant" to do some testing.  The features that get added to Office 365 are staggering - You can see the road map here.

One evening, I decided to flip the switch.  I've successfully made the switch over to Office 365, and it was a piece of cake.  I'm starting to assemble some of the steps I've taken to make Office 365 a great way to consolidate all of my email and the use of some of the functions Office 365 offers to make my consolidated email box something that is functional and not overwhelming. Look for those notes to appear here over the next couple of weeks - Including setting up websites in Azure!


Wednesday, November 5, 2014

An ISACA volunteer

Twice a year, I disappear for about 3 days to participate in a question writing and proofing exercise for ISACA, a non-profit organization charged with leading the information security, risk and assurance certification as well as education.  They are most notable for their CISA and CISM certifications.

I earned my CISM a number of years ago and over the course of time, I've always had a little bit of a challenge obtaining CPE (Continuing Professional Education) credits. A minimum number of credits is required to maintain the certification.  I was working for a failing financial institution, and it was nearly impossible for me to get funds to take courses or attend events that would allow me to obtain credits.

Luckily, there are a number of other ways to obtain CPE credits: 
 - Answer questions in the back of the monthly journal
 - Write articles for the journal
 - Write test questions for a certification pool
 - Mentor others toward a certification

I always thought it would be fun to try to attempt writing test questions for the CISM exam, so one day I did!

Shortly after submitting my attempt at creating about 15 questions, ISACA and I launched a fantastic relationship, to which I am thankful to have with this organization to this day.

My involvement in writing test questions lasted only one year when I was then asked to be part of a committee called the Test Enhancement Subcommittee, which not only writes questions for the exams, but is in charge of proofing all of the questions that get submitted.  Better yet, I get all of my CPE for the year just by participating!

In the beginning, I was more excited about being able to obtain all of my CPE easily, but as I continued to get involved in the TES with ISACA, it was clear to me that I was part of something amazing - a continually refining exercise that produces relevant questions to test an applicant's base of knowledge!

Working on creating and modifying questions for the CISM certification is a rewarding experience, but it is the relationships with the other volunteers and the wonderful staff at ISACA that make me proud to be a volunteer and to be part of the process.


Thursday, October 9, 2014

Mobile Device Management - and then some...

Looking at the many Mobile Device Management systems out there, it doesn't seem that any one of them have it all. Sure, some of them do a particular function very well, but there always seems to be something lacking with the whole package. When it comes to MDM, I am definitely thinking about more than managing the device. Managing the identity and protecting the data are equally as important.

The following diagram is put together by Microsoft, so there is an obvious bend to it, but it clearly shows how each product ranks. At this point, it looks like EMS has a complete package and at about 7 bucks per month, its attractively priced:

Monday, January 27, 2014

HIPAA Checklist

With all of the compliance associated with HIPAA and the new rules coming down, not being in compliance is very risky.

One of our businesses was a little behind on the formalities associated with HIPAA compliance and needed to create a scorecard to assess where they are and where they need to be.  Not wanting to re-invent the wheel, I reached out to some of my colleagues, of which, an acquaintance at Grant Thornton pointed me to HIPAACOW.

While they DO have a mascot of a cow, the actual term is an acronym that stands for the Collaborative Of Wisconsin.  While the logo is whimsical, the group is not to be dismissed.  There is a wealth of information, checklists, templates, etc.

Check it out:
http://www.hipaacow.org